21 January 2011

Makin' stuff for the Jetta on the lathe

Even though Jettas came from the factory as either gas or diesel, some of the diesel-specific parts are NLA (No Longer Available) from the dealership or simply missing from the local junkyard. So when you don't have the parts you need, you make them!

When my engine came from the junkyard, it had a crushed the oil pan. Unfortunately, the turbo-diesel uses a special oil pan with an oil drain for the turbocharger -- a special oil pan that is now unobtanium. So I took a regular oil pan, drilled a big ol' hole in it, and made a threaded bung on my lathe. "Made" might be too strong a word, as I bought a brass fitting at Home Depot, chucked it in my lathe, and modified it. I can cut threads on my lathe, but that is an "advanced" operation that I don't have the time or tooling to tackle right now so it was faster to just buy something with the threads I wanted and cut away the stuff I didn't want.

Brass if fun to machine, by the way. It hisses and sprays a lovely golden glitter everywhere. It's like a Barbie glitter gun for men. Makes me want to make more flashlights out of brass than aluminum... but not until the Jetta is done!

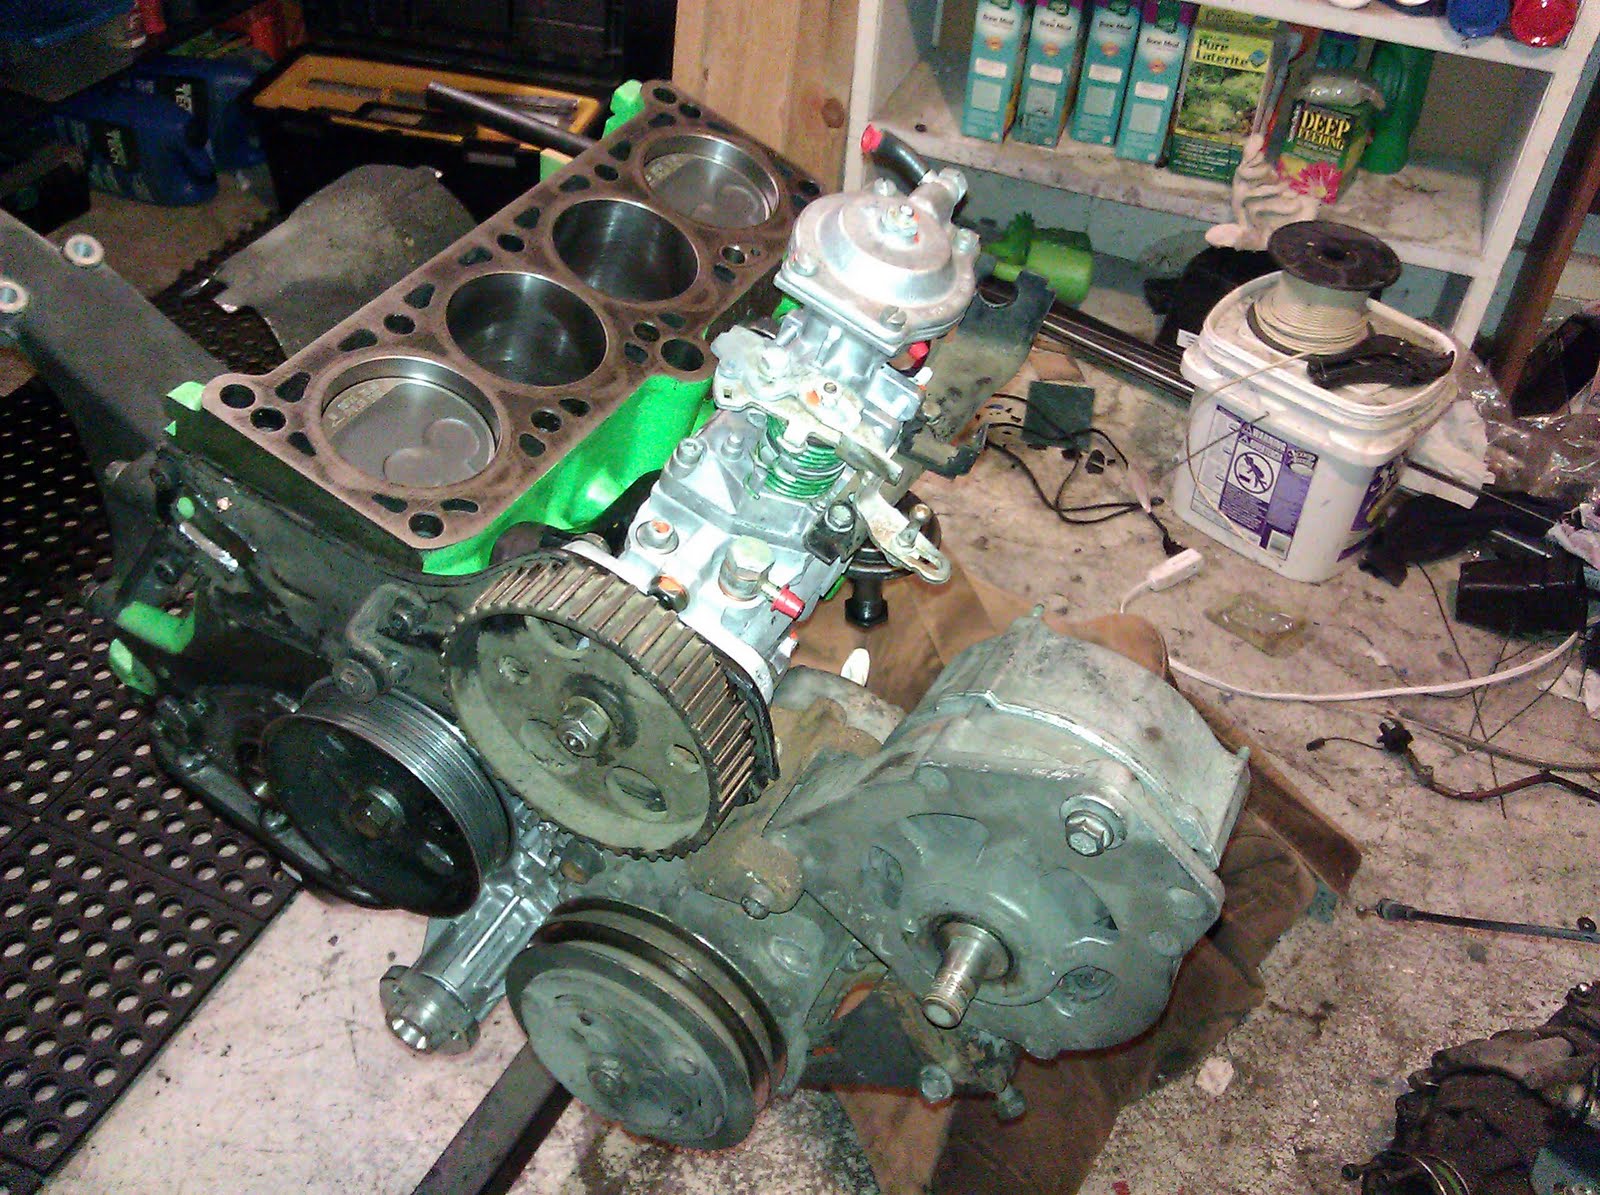
Anyway, I attempted to solder my bung to the oil pan and completely and utterly failed. Solder stuck to my brass fitting but not the steel oil pan. Conceding defeat, Lemontree took it to her father, a career welder, and he brazed it (you can't weld dissimilar metals -- brass and steel -- so brazing, which is almost as good, is required). It may not be pretty but it'll be hidden inside the engine where no one will see it (arrowed in green).


Next up was a blockoff plate where the blowoff valve used to be. You'd think VW knew what they were doing when they engineered a car, but believe it or not, they stuck some extra stuff on there that is not needed. One of these things is a blowoff valve which is designed to prevent the turbo from over-boosting the engine... it's unnecessary because the turbo already has a wastegate to limit boost. And anyway, I sort of lost the little clamp that clamps the blowoff valve (oopsie) and of course the clamp is now unobtanium too (anyone that has one, needs it for their car!). Solution? Turn a blockoff plate on the lathe! Took a long time to saw off some 2" aluminum stock... I could really use a bandsaw, but just don't have a place to put it. :(


Plate made (arrowed in red above), I again (foolishly) tried to solder it on. Even more dismal failure. It seems I am not destined to work with hot metal, just cut it. Fine. This part is not subject to stress and only needs to hold back 15PSI of boost pressure, so, JB Weld that sucker on. Gotta get 'er done!!


Next I needed to mount the alternator. I'd lost the arm (yeah, I've lost a lot of things) that braces the top so I got some 1" x 1/8" flat stock from a metal supplier in town (well, Lemontree did... thanks Lemontree!), measured, drilled two holes in the drill press, cut to length, and ground down the sharp edges and corners (arrowed in red above). The thing is though, the alternator bolt hole is scooted over half an inch from where the arm is attached, so the arm either needed to be bent or I needed a spacer. Hm, making a spacer would require using the lathe, so... no brainer! Faced some 3/4" aluminum stock, drilled, and parted off to length (green arrow above). Since I haven't equipped my lathe with precision readouts yet, I eyeballed it and ended up .004" too short... ah well, close enough!

Next, I was somehow missing the correct lower alternator bolt. I had one that was too long but didn't have enough threads, so I just whipped out a die and cut some more threads, then cut the bolt shorter to a more convenient length. My hands now smell of the lovely sulfur-based cutting oil I used, mmmm, reminds me of Yellowstone.

Tomorrow the engine should go in. I hope.

18 January 2011

Boltin' more stuff on

VW diesels are a little unusual -- the pistons poke up above the surface of the engine block:


This is due to the extremely high compression ratio of 22.5:1 (your gas car is probably between 8:1 and 9.5:1) -- it needs to squeeze all the air into as small a volume as possible.

Due to this piston projection, you need to keep the pistons from crashing into the cylinder head. As the amount of piston protrusion varies based on your main bearings and wrist pin bushings (you recall I just replaced those), VW supplies three different thicknesses of head gaskets. Why not just use the thickest for maximum clearance? Well you can, but the lowered compression ratio will make your car hard to start in winter. So you actually want as thin as possible for cold start performance without being too thin and things hitting each other. I measured my piston stick-up and determined that I needed the thinnest gasket available. This made me a little nervous, but after I bolted the head on


and installed the timing belt


I was able to turn the engine over just fine without the pistons bumping into anything. Whew!

11 January 2011

Boltin' stuff on


Bolted on the windage tray, oil pump, oil pan, water pump with upgraded rubber gasket (better than fiber, and re-usable), A/C bracket, A/C compressor, front crank mainseal, intermediate shaft seal with pulley, oil galley plug (machine shop forgot to reinstall -- grr), injection pump brackets, and injection pump with sprocket. Discovered the crankshaft sprocket bolt VW sold me was totally wrong (what is with me and bad parts?!), and also the water pump pulley is wrong (see?!).

A lot of the parts I'm bolting on are rusty and dirty, unlike the eat-off-it-clean and painted engine. I don't care. No time for pretty.


You can also see a mock-up of the alternator, this is just a random spare I had from somewhere I used to see how things will fit. The stock VW alternator tensioning system leaves a lot to be desired, so I will be making a new and improved one (having a lathe rocks :) ).

I could have had the engine in the bay this week if VW had sold me the right bolt -- tomorrow the head should go on, and once that is done (and I get my bolt) it's ready to install. I think.

07 January 2011

Found 'em

Can you spot the all-important engine-bolt-bag in this picture?

Just kidding, it's not there, it's safely in the garage where I'm about to start using it tomorrow. Lemontree found it in the place I'd looked about six times.

06 January 2011

Go watch Inception

...and in an attempt to set a record three postings in a day, let me say how awesome Inception is!! The best movie ever made, is, of course, Star Trek II: The Wrath of Khan. But Inception just made #2 on my list. After the first time I saw it, I thought it was great and deserved to be the #3 best movie ever made, but it just came out on DVD -- and after watching it again, now I think it's #2. That's how good it is.

Fantastic (and very very appropriate) soundtrack, stunning visuals, good acting, good casting, good plot, good script... admittedly there are a few minor holes in the story but who cares when the other 99.9% of the movie is stuffed with awesome like a giant teddy bear stuck in the stuffing machine?! This movie makes you think, but isn't boring. Stuff happens fast, but it's paced so it doesn't wear you out. Unexpected things happen to keep you off your feet, but you aren't beaten over the head by obvious plot devices. This movie has subtleties: man I love subtleties, and they are so rare in movies.

I even, dare I say it, wasn't bothered by a little bit of shaky camera -- those of you that know me know I hate shaky camera movies (i.e., the second and third Bourne movies were totally ruined by the epileptic camera guy overdosing on meth). And I'm sure I'll catch some flak from you by admitting this, but Inception used it correctly -- i.e., sparingly -- and Made It Work.

So few movies are worth watching these days. This is one of 'em.

Anti-fatigue mats

Unfortunately, now I can't find the big bag of nuts and bolts that hold various parts on the engine... so tomorrow will be an excavating party in the boxes of Jetta parts to find it. In the meantime, I installed some more rubber mats to go all around the workbench. I got one of them a couple years ago and they make a HUGE difference when you're standing on concrete. Those things would still be a deal at twice the price, in my opinion.


I cut these a little to fit, easy to do with a utility knife. The sections snap together with little nubs. Dirt and swarf fall down in the holes, so you don't slip or get metal slivers embedded in the soles of your shoes. The mats still lift easily so you can sweep under them occasionally -- say, annually, or whenever the holes look like they're about to overflow. ;)

Pistons are in!


This lump of iron is finally starting to look like an engine again. Though I haven't posted for a while, I have been busy with things. Hit yet another snag after all the work I went to to install those wrist pin bushings -- the wrist pins did not fit!! I only discovered, after it was far too late, that new wrist pin bushings ship undersize and have to be reamed to fit your pins. Ugh. Thankfully, I found a really good machine shop that did it for about 1/4 the cost I expected so the damage to the wallet wasn't too bad. There was yet another delay of several days, though, which hurts the most.

Once I got my rods back from the shop, installation of the pistons went a bit easier than I expected. I purchased a cheap ring compressor from Harbor Freight, which, typical of Harbor Freight, did not work out of the box. Apparently it was designed to install the pistons in 18-wheel Mack trucks or perhaps ocean-going cargo ships, because it was way too big for my little VW pistons. However, cutting it down to 2/3 it's original size allowed it to compress my rings and the pistons were tapped into the cylinders with a chunk of wood and a rubber mallet. With any luck, I can finish the major portions of the engine block tonight and bolt the head on tomorrow. That means the engine might be ready for installation in the car on Saturday! Exciting times!! But I'm not getting my hopes up... some minor snag will probably delay things yet again. In fact, now that I think about it, I don't have a head gasket -- hopefully the local shops stock them so I don't have to wait for shipping.

27 December 2010

Lathe got legs

When we built the workbench, we set the height to something that Lemontree would be comfortable with, which put the lathe a bit lower than optimal. Actually, I wanted the lathe up on legs anyway, to make cleaning the chips out from underneath it easier, so it was a mutually beneficial arrangement.


Since I had finished the wrist pin bushings (even drilled the oil holes, above) and was waiting for parts and supplies to do the next stage on the Jetta, I sawed, sanded, and drilled some 4x4 left over from the workbench to make legs for the lathe. After drilling the small holes for the bolt threads, I transferred the locations to the bottom for bigger holes for the bolt heads.


I used some tape on the big drill bit to gauge the proper depth for the bolt heads. Came out pretty good!

Fortunately I had an extra-long Allen wrench from working on cars.

Looks like Bigfoot...

24 December 2010

Success!

I completed one more diameter on my press mandrel -- the shoulder that pushes on the wrist pin bushing in the connecting rod:


Here's what the press looks like:


There's a bottle jack on top, the same type you might use to jack up a car, or that Tom Silva uses on This Old House to lift up walls and ceilings and things. As you extend the jack, it pushes down on the column in the middle, which presses on your part. I'm using a small 2-ton jack instead of the 6-ton jack that came with the press -- the 6-ton was a cheap jack that lasted for about two pressing operations.


Here we are, about to start pressing and hope nothing (like the connecting rod!!) breaks. There's always a bit of apprehension when you're applying, literally, tons of force on things.


No drama, fortunately. Here you can see the old bushing is partially pushed out. My mandrel won't push it all the way out, but it doesn't need to. Once I get the old one on started it's way out, that makes room for the new one to push the old one out as it goes in. Here you can see, from top to bottom, the press ram, my mandrel, the new bushing, the connecting rod, and the old bushing peeking out the bottom:


And there we are, one connecting rod re-bushed, three to go. Also, annoyingly, the new bushings don't come with oil holes (as you can see in the old one), so I'll have to drill them too. But that shouldn't be difficult to do on the drill press.

23 December 2010

Christmas came early

So... ran into another problem on the Jetta. Tried to press out the old wrist pin bushings from the connecting rods, using one of my sockets to press on the bushing. No go, one size of socket was too big and the next size too small with no in-between. So, our options were go to a machine shop again, or make a press mandrel of the proper size. Since we didn't want to wait days and pay $$ for a shop and had a perfectly good lathe sitting in the garage, Lemontree gave me special dispensation to turn a press mandrel on it!!

First we needed some metal to machine. The first place we went to was closed, even though it was during their normal business hours. We assumed they were on a holiday break and just failed to hang a sign or change their voicemail greeting (grr). Fortunately, Lemontree noticed an old phone book on the floor of the car, and managed to find another place that sold metal. That place had moved, but they had kindly put a sign up listing their new location (the first place could learn a lesson from these guys!). So it was we finally arrived at Gem State Metals, where I got a 1.5" diameter bar of leaded 12L14 steel, 12" long. 12" was way more than I needed but hey, there was a minimum purchase requirement and I can always find uses for it later. Cost was $7, if you were curious. Here it is standing next to the lathe, as I clean the shipping grease off:


Next I needed to cut a suitable piece from my bar stock, as my 10" lathe really wouldn't be able to do much with 12" of steel. I clamped it in my vice and started cutting with a hacksaw, but ended up with a tired arm and only a shallow slot. Wising up, I grabbed the recip saw, loaded it up with a metal cutting blade, and made better progress. It still took a good 15 minutes to make it through that thing, but at least I was just standing there letting the saw to the work. Here's all the metal "sawdust" I made:


Before I get any further, here is a diagram of a lathe so you know what I'm talking about:


Next I had to mount the workpiece in the lathe chuck (which mounts on the spindle). This wasn't as easy as it sounds, because both ends had been rough-cut so it would wobble around if I seated it solidly back against the chuck jaws. Fortunately, I had watched the entire series of MIT machine shop videos, so I knew what to do -- whack it with a mallet. No, really. I got it straight within .004" of wobble ("runout", in machine-speak) which was not bad for a newbie.

Now I got to make a facing cut to square up one end. I made my first chip and had to stop to take a picture before getting any further.


Then I started making pass after pass to flatten the end, but after many passes my hand got tired and the lathe didn't seem to be cutting any more. Watching the entire machine instead of just the cut as I wound in the cross-slide, I saw the entire carriage was winding itself out under the pressure of the cut! OK newbie, lock that carriage down and try again... yup, now we're cutting metal again!

With one end faced, I flipped it around -- easier this time, as my newly flat end could simply be seated against the chuck jaws without wobble (or at least, no more than the .004" I had when I faced the first end). This was quickly and easily faced, and I moved on to drilling.

My intention was to make two mandrels, a top and a bottom. This piece was going to be the bottom, so it needed a hole for the old bushing to fall inside as it was pressed out. I started the hole with a 1/4" drill, then moved up to a 1/2" (my biggest). Drilling with the 1/2" was scary easy, just the slightest pressure on the tailstock and the bit dug right in. This leaded steel is nice stuff to machine, which is good as it's designed to be easily machined.


Next was to bore out the 1/2" hole to 1.087", but the cheap little Harbor Freight tool bits I was using wouldn't fit in the hole (well, they would, but not in the right position to do any cutting). I didn't expect to be using the lathe this soon, so I haven't gotten all the tooling I needed for it, such as a proper boring bar. Ah well, plan B! I'll use this piece for the top mandrel, and bodge something together for the bottom mandrel later. The top one is the critical one anyway, as it's the one that needs to be perfectly straight and centered. It'll have an extra hole in the middle now, but that's ok.

I needed to turn down a section to fit inside the old bushing. This will center the mandrel and guide it straight. I needed to go down to 0.940", from 1.500", so it took a lot of work. I made even more work for myself by mounting the tool a little crooked in my tool post, so I ended up with a taper instead of a nice sharp shoulder. Ah well, live and learn, re-adjust the tool and take pass after pass to make the shoulder square. Finally, I turned down the guide section to the final diameter and tested the fit with a connecting rod -- eh, a couple thousandths of an inch smaller than I might have liked, but it will do nicely.


As I worked, I even managed to improve my surface finish by adjusting the lathe speed and how fast I cranked the handles. Steel makes a neat "shhh" sound when you cut it right, though the chips are quite hot (yes, I got burned a few times when they landed on skin).

That's it for the day... will do more tomorrow!

22 December 2010

Zen and the art of... tool walls?

One of the impediments to getting the Jetta done was the state of my tools. Oh, they started out organized a few years ago... but as time went on, everything just got thrown into one of two large toolboxes with no regard for... er, with no regard. Thus digging into the bottom of two toolboxes was required to find most things. This was clearly unacceptable for putting a Jetta together in the minimum of time, so one trip to Home Despot and a bit (well, actually, a rather lot) of time later, we have a rough approximation of tool nirvana:

If you noticed the mirror, it's not because I'm vain, honestly -- it's sometimes necessary to see what's going on behind engine blocks or in other nooks and crannies.

I still have stuff in one toolbox, but it's stuff that is only rarely used and it is somewhat organized with lots of little compartments molded in to the plastic lid. I also recycled the tin box one of my socket sets came in -- it now holds crochet hooks. Crochet hooks, it turns out, are handy instruments for, well, hooking on to various automotive bits like seals, boots, and other things and pulling on them. Also for crocheting.

Lemontree also managed to fill 50+ of the little drawers by cleaning out the jars of screws and nails and such.

The garage is still only half done, with a good 7 feet or so of wall to the right of the workbench to be cleared of existing stuff and clad with new shelves, but I think things are well enough organized to proceed with Jetta work for now. At least, until I'm stopped by an incorrect or missing part... which seems to happen with distressing regularity.

21 December 2010

More progress

Got the upper standards hung, brackets slotted in, shelves snapped in place, and storage bins settled. Katie supervised.
Still need to fill the bins though...

18 December 2010

Having an organized workshop ROCKS!

The valve adjustment shims for the Jetta arrived today, so I decided to make a holder/organizer for them. About two dollars worth of PVC, bolts, and nuts and 5 minutes cutting, drilling, and deburring resulted in this:

Now I can browse my shims like a card catalog. :) Man, I don't know how I ever survived in that dingy, dirty, unorganized garage... it's sooo nice having power tools, a place to plug them in, and a clean, open surface to work on all within two steps!

128 drawers

If you thought we were going to have a lot of shelving, you haven't seen our drawers yet! Yep, 128 of them just arrived. These will hold fasteners (bolts/screws/nuts) and electronic components (resistors/capacitors/ICs) and anything else that now gets thrown in a jar and is thus impossible to find and requires making a mess to get to.