I made a little video and put it on YouTube:
http://www.youtube.com/watch?v=oRv6UXpVwrE

23 June 2011
My Macaroni & Cheese Lunch
At times I find myself slipping from what I would consider healthy eating. I know probably everybody has their own idea of what that means, but for me, what I struggle with most is increasing the amount of vegetables that I eat and decreasing extra sugars, extra fats, and animal products, while still eating foods that are appealing to my family. Food is a sensitive subject to most people, and no less around our home. Still- there's this struggle within me to increase vegetables that my family eats, without upsetting the balance too much.
On to lunch today. Katie wanted macaroni and cheese. The obsessed mother that I am decided I can make mac and cheese, and add some vegetables, and we would both be satisfied. I gave a moments thought to what might work in mac and cheese and what I have available. I started by picking some herbs from my herb garden. Spearmint, lemon mint, and oregano. Then crimini mushrooms from the refrigerator. I chopped everything up , putting a pan on the stove with a little canola oil to heat.
 I sauteed the mushrooms first, then added the herbs to wilt. The smell of mint cooking is an interesting one. Mint is one of my favorite herbs for a stirfry. The flavor is very different than you might imagine. It is not what one thinks as "minty", it is not gum or toothpaste or mouthwash. Instead, it is a rich herby flavor. It reminds me of middle eastern food.
 While that was cooking, I started on the cheese sauce. A little water in the pot, mixed with salt, pepper, and flour, brought to a boil and thickened to a paste. I know this may also seem strange to some of you, but I am opposed to using milk, unless I really need to. Water works just fine.
 Next, I added a can of petite diced tomatoes to the pan of herbs and mushrooms and left it to simmer and the flavors to mix.
 Back to the sauce, here I am adding cheese to the pasty base. On low heat, added a little at a time the paste transforms into a thick cheesy sauce.
 When all the cheese has been added to the sauce and melted thoroughly, it is time to combine the elements.
 I put the sauce on low heat and finally started cooking the macaroni. I really like the shells form of whole wheat pasta best, but the grocery store was out of stock, so I bought macaroni this time. I think I like the shells better because they are able to be coated on all sides with the sauce, so they don't have the heavy flavor often associated with whole wheat pasta. Here's the picture of the final product. Appetizing, no? I guess that all depends on who you are.
The final assessment: Three girls come in for lunch. Right away Tiffany tells me how good it looks. I expected that. She's a food lover and hard to disappoint. The other two, however, fall into, I kid you not, howls of how awful this latest food monstrosity is. Not looks, but IS. I dished up bowls for the kids. I gave Tiffany a full bowl, Emily a generous scoop (about half a bowl), and Katie a mere two bites' worth. Yep, I know my kids and how much I'm able to coax them to eat even when they truly don't like something. Tiffany ate her bowlful, as expected, and had seconds, then thirds, raving the whole time. :) Emily continued her protest, I left the table to let mine cool, it was still pretty hot. When I came back, she not only tried it, she finished her bowl, then went back for seconds, and thirds. Yay! it was a hit for her as well. :) :) Well, then we were down to Katie. This kid is stubborn. She tried every dodging tactic. "Can't I eat a peanut butter and honey sandwich instead, mom?" "Or wheat thins?" "or peanut butter and honey on saltines?" I told her if she chose not to eat the (two bites!) macaroni, the only thing she could eat was fruit or vegetables. It took a lot of coaxing. She ate one macaroni and declared it tasted like a skunk smells. I finally suggested she put a little parmasan cheese on top. She did that, and ate her two bites all up, minus the vegetables. I then let her have a peanut butter and honey sandwich.
On to lunch today. Katie wanted macaroni and cheese. The obsessed mother that I am decided I can make mac and cheese, and add some vegetables, and we would both be satisfied. I gave a moments thought to what might work in mac and cheese and what I have available. I started by picking some herbs from my herb garden. Spearmint, lemon mint, and oregano. Then crimini mushrooms from the refrigerator. I chopped everything up
 , putting a pan on the stove with a little canola oil to heat.
 I sauteed the mushrooms first, then added the herbs to wilt. The smell of mint cooking is an interesting one. Mint is one of my favorite herbs for a stirfry. The flavor is very different than you might imagine. It is not what one thinks as "minty", it is not gum or toothpaste or mouthwash. Instead, it is a rich herby flavor. It reminds me of middle eastern food.
 While that was cooking, I started on the cheese sauce. A little water in the pot, mixed with salt, pepper, and flour, brought to a boil and thickened to a paste. I know this may also seem strange to some of you, but I am opposed to using milk, unless I really need to. Water works just fine.
 Next, I added a can of petite diced tomatoes to the pan of herbs and mushrooms and left it to simmer and the flavors to mix.
 Back to the sauce, here I am adding cheese to the pasty base. On low heat, added a little at a time the paste transforms into a thick cheesy sauce.
 When all the cheese has been added to the sauce and melted thoroughly, it is time to combine the elements.
 I put the sauce on low heat and finally started cooking the macaroni. I really like the shells form of whole wheat pasta best, but the grocery store was out of stock, so I bought macaroni this time. I think I like the shells better because they are able to be coated on all sides with the sauce, so they don't have the heavy flavor often associated with whole wheat pasta. Here's the picture of the final product. Appetizing, no? I guess that all depends on who you are.
The final assessment: Three girls come in for lunch. Right away Tiffany tells me how good it looks. I expected that. She's a food lover and hard to disappoint. The other two, however, fall into, I kid you not, howls of how awful this latest food monstrosity is. Not looks, but IS. I dished up bowls for the kids. I gave Tiffany a full bowl, Emily a generous scoop (about half a bowl), and Katie a mere two bites' worth. Yep, I know my kids and how much I'm able to coax them to eat even when they truly don't like something. Tiffany ate her bowlful, as expected, and had seconds, then thirds, raving the whole time. :) Emily continued her protest, I left the table to let mine cool, it was still pretty hot. When I came back, she not only tried it, she finished her bowl, then went back for seconds, and thirds. Yay! it was a hit for her as well. :) :) Well, then we were down to Katie. This kid is stubborn. She tried every dodging tactic. "Can't I eat a peanut butter and honey sandwich instead, mom?" "Or wheat thins?" "or peanut butter and honey on saltines?" I told her if she chose not to eat the (two bites!) macaroni, the only thing she could eat was fruit or vegetables. It took a lot of coaxing. She ate one macaroni and declared it tasted like a skunk smells. I finally suggested she put a little parmasan cheese on top. She did that, and ate her two bites all up, minus the vegetables. I then let her have a peanut butter and honey sandwich.
22 June 2011
The Incredible Shrinking Garage
Looking north...
 ...and south:
It's amazing. The garage shrunk when I got the Jetta out, and shrunk again when I cleaned the stuff out ot it.
On the upside, it's not a single-car garage any more... it's a two-motorcycle garage. :) During the summer, at least. Winter 2011-2012 will finally be the year I don't have to scrape my car every morning, though I may end up backing the car out during the day to make room for reloading or woodworking.
18 June 2011
Wall upgrade
Possibly the first time "wall" and "upgrade" have been used together?
One thing that I found very, very handy is a whiteboard in the home machine shop. I use it to to jot down Home Lowes shopping lists, measurements, etc. Since I hadn't permanently mounted mine to a wall yet, I would just lay it on the workbench where I was working. Doing that was so handy, I decided not to permanently attach it after all.

I've had this bit of sheet steel in my scrap bin since the engine rebuild. My Harbor Freight piston ring compressor was way too big for wittle VW pistons, so I had to cut this section off to make it work. Now I'm putting it to good use by drilling two holes and gluing it to the back of my whiteboard. I had to glue it because the sticky foam that came with the whiteboard didn't stick to metal.
 I used the belt sander to clamp the glue joint until it dried:

The other thing that I use often is a chart that shows drill sizes in Imperial (inches) and Metric (mm) as well as the size of hole you should drill to tap a particular thread. I've gone through several of these because they get dirty and oily and wrinkled and lost. To solve this, I used "clear contact paper" (adhesive plastic laminate) to affix it to some sheet steel from Home Lowes.

 The sheet steel came big enough to make two page holders, so using front and back I still have room for 3 more reference charts should I want to add them in the future.
Drilled another hole, put some brass hooks on the wall (I decided to risk hammering them into the drywall, time will tell if that turns out to be a foolish mistake if I have to remount them with proper metal spider drywall anchors), and done:


(Yes, that's a calculator stuck to the magnetic whiteboard with magnets. Also very handy.)
Oh and while I was having fun doing non-Jetta things, I decided to fix our broken lawn chair. I drilled a bunch of shallow holes for the JB Weld to grip. JB Weld seems to be strong enough for many tasks, but it's adhesion, especially on smooth plastic, has often left me wanting. The holes should let JB Weld make little "fingers" to keep the joint from pulling apart. I hope.

 Not too pretty, but our lawn chairs are fading to white so I should probably paint them anyway.
One thing that I found very, very handy is a whiteboard in the home machine shop. I use it to to jot down Home Lowes shopping lists, measurements, etc. Since I hadn't permanently mounted mine to a wall yet, I would just lay it on the workbench where I was working. Doing that was so handy, I decided not to permanently attach it after all.

I've had this bit of sheet steel in my scrap bin since the engine rebuild. My Harbor Freight piston ring compressor was way too big for wittle VW pistons, so I had to cut this section off to make it work. Now I'm putting it to good use by drilling two holes and gluing it to the back of my whiteboard. I had to glue it because the sticky foam that came with the whiteboard didn't stick to metal.
 I used the belt sander to clamp the glue joint until it dried:
The other thing that I use often is a chart that shows drill sizes in Imperial (inches) and Metric (mm) as well as the size of hole you should drill to tap a particular thread. I've gone through several of these because they get dirty and oily and wrinkled and lost. To solve this, I used "clear contact paper" (adhesive plastic laminate) to affix it to some sheet steel from Home Lowes.

 The sheet steel came big enough to make two page holders, so using front and back I still have room for 3 more reference charts should I want to add them in the future.
Drilled another hole, put some brass hooks on the wall (I decided to risk hammering them into the drywall, time will tell if that turns out to be a foolish mistake if I have to remount them with proper metal spider drywall anchors), and done:


(Yes, that's a calculator stuck to the magnetic whiteboard with magnets. Also very handy.)
Oh and while I was having fun doing non-Jetta things, I decided to fix our broken lawn chair. I drilled a bunch of shallow holes for the JB Weld to grip. JB Weld seems to be strong enough for many tasks, but it's adhesion, especially on smooth plastic, has often left me wanting. The holes should let JB Weld make little "fingers" to keep the joint from pulling apart. I hope.

 Not too pretty, but our lawn chairs are fading to white so I should probably paint them anyway.
And the results are in...
Stamped...
Chalked... looks great so far...

...and clear coated.
 It actually looks better in the pic than it does in real life. I think the spray paint blew away some of the chalk, in retrospect I should have used clear paint from a container and just dripped a drop over each number. Still, it worked ok.

Chalked... looks great so far...

...and clear coated.
 It actually looks better in the pic than it does in real life. I think the spray paint blew away some of the chalk, in retrospect I should have used clear paint from a container and just dripped a drop over each number. Still, it worked ok.
17 June 2011
Fortress still not quite done
I'm not a fan of drywall anchors. They never seem to hold (which is why I hung all of the garage shelving from studs). The anchors holding our towel rack in our bathroom failed, as did the ones I attempted to use to fasten my workbench power strip to the wall. The only thing I still trust drywall anchors for are paper towel dispensers, and even then, I used the upgraded metal spider type and not the crummy useless plastic slug type.
For the power strip, which takes a lot of force when unplugging cords, I had Lemontree get me some toggle bolts. I used these to securely mount a scrap of plywood to the wall. Then I was able to use wood screws and zip ties to get the power strip off the workbench, saving precious space:
 I also tucked the cords neatly up and away, behind the shelf and 3-zillion-drawer-unit. You may notice that this power strip has those annoying "child safety" covers on the outlets. This is by design -- some time ago, I was turning aluminum on my lathe which makes big long curly strings of swarf. Suddenly, the lights went out and my lathe stopped! Looking around in confusion, I assumed I tripped a breaker somehow. Nope, breaker in the main electrical panel wasn't tripped. Breaker at my power strip wasn't tripped. What the... oh, the GFCI outlet tripped. Reset and it immediately tripped again. I finally isolated the issue to my power strip, and saw that a very long continuous string of aluminum had shorted my metal lathe with the "hot" slot of one of the outlets! The GFCI sure saved me from some fireworks there. I went out and got a strip with safety covers after that.
Anyhoo, one thing lacking on my tool wall was allen keys. I couldn't find anything suitable at Home Lowes* or online, plus with the Jetta (mostly) done I now have time to spend on fun projects like making my own allen key organizer.
* I like to use the term Home Lowes, because when I need to get something from a "Home Center" or hardware store, I don't care if it comes from Home Depot or Lowes -- just whichever is more convenient at the time. I don't care if it comes from Ace, either, but "Ace Home Lowes" is just too long of a name to rattle off.

Like the drill organizer, I just measured each of my allen keys across the points and selected the next drill bit size up (measuring across the flats would of course result in holes too small for the key to fit in). Even still, the larger keys fit perfectly but the smaller keys wouldn't go in the resulting hole. Apparently, when you drill small holes in wood, your holes end up undersize? I guess because the wood grain relaxes and moves as you relieve internal stresses. Anyway, the last few holes were a pain, drilling and redrilling bigger and bigger until things fit.
That done, drilled a snug hole in one end and Gorilla-glued in a pegboard hook:
 Unlike my drill bit organizer, I decided to paint this one. Mainly because my hands get black and greasy working on cars, and plain wood would look pretty nasty after a while.
Lemontree bought a letter and number punch set, so I plan to stamp the allen key sizes on the organizer at some point. I don't think they're going to show up black on black painted wood, though, so I'm going to try highlighting them in white by scrubbing chalk over them and then wiping off the excess, then hitting it with a coat of clear spray paint to seal the chalk in. We'll see how that turns out.
After this, I need to make an abrasives section in the garage for all my sandpaper, scrubbing pads, files, brushes, etc. And I still need to organize the woodworking supplies, as well as my "hot work" stuff like propane torches and such. Then maybe I can start machining things in earnest, if no other projects crop up first...
11 June 2011
Fortress becoming Awesomer
I finished up a couple of odds and ends on the Jetta so I can take it to a shop to get an exhaust system installed next week (right now it has none, so the exhaust just comes out the engine compartment. Open pipe turbo sounds neat though! Screams like a jet engine.) That done, I started on the final leg of the Fortress's construction.
 I hung some standards, screwing them into studs...
 Then attached brackets and snapped wire shelves on. The shelves serve two purposes, and only one of them is to store things:
 I've suspended a second shop light from the shelves to provide better light for drilling and reloading. Then, to power the drill press and the new shop light,
 It's hard to tell on a cell phone pic, but there are four screws and two zip ties holding the power strip on. I think zip ties are the new duct tape! Anyway, I didn't want this on the work bench, space there is precious because the work surface is so shallow. Underneath is slightly less convenient but works fine.
Look what I can do now!! My baby won't get rained on any more. :)

09 June 2011
Workbench upgrades
I made the workbench height kind of low on purpose, both to accommodate Lemontree and to make it easier to work on tall things sitting on the bench. One drawback to this was the (lack of) height of the grinder, which I use to make and sharpen toolbits for the lathe. I had some scrap plywood left over from making the tool bench, so I sawed a few chunks off and made a grinder riser/storage box:
 The box's dimensions were largely dictated by the size of my scrap. It holds a "dressing stick" and a cup of water. The grinding wheel is a mixture of abrasive and an ablative material; after a time, it stops grinding and just rubs on what you're trying to grind. The dressing stick has abrasives of it's own which strip off this glazed layer of ablative and gets you back down to fresh abrasive. The cup of water is to cool the toolbits periodically -- otherwise scorched fingers result. You might ask why I don't wear gloves? Well, you never, ever want to wear gloves when working around any kind of rotating machinery. Gloves might sound like a good idea to keep your fingers from getting scorched or scraped, but in reality you have less control of your toolbit with gloves and worse, the gloves tend to catch between the wheel and the toolrest or guard which grabs you and sucks you in. Ugly.
I also got to use my new drill press for the second time today. Yesterday was the first; I have a little motorcycle lock key that had a big ugly plastic handle. I broke the plastic off and drilled a tiny hole in the metal key shank so I could put it directly on my keychain:
 Much better.
My second use of the new drill press was to drill and countersink the strip of steel that I just put across the front lip of the work bench:
 I probably can't call this an upgrade, because I had planned to do it all along but it got put on the back burner until the Jetta was done. The strip has three functions: 1) protect the wood edge when humping large, heavy, hard objects like transmissions up onto it; 2) to keep round objects from rolling off the front of the work bench, never to be found again; and 3) to provide a durable surface for pushing or banging on things to put them together or take them apart.
I used a countersink bit so the screw heads sit flush and don't stick up above the metal strip, but unlike a drill bit that makes neat little curly strings of swarf, the countersink makes thousands of tiny sharp needles. Nasty. I used a rare-earth magnet to pull most of them out of my skin. Again, no gloves around rotating machinery, so that's about the best I could do. Hopefully countersinking is not something I have to do often...
07 June 2011
More workbench
Now that the Jetta is out of the way, I was finally able to finish the other half of the workbench. Off to the right of the original bench on the back wall, I built another 8 feet on the side of the garage. Since this is a single car garage, however, I couldn't make the surface very deep, or I wouldn't be able to get a car in. And since it is so shallow, I can't hang any shelves on that wall above the surface. Well, I think I might still hang some above head-height where they won't be in the way.
 I also upgraded my drill press. The little $50 8" press was fine for wood but was simply not rigid enough nor could it go slow enough to drill 1/2" holes in steel or even aluminum (the bigger the hole, the slower RPM you need, and the little press's slowest speed was about 3 times too fast). My options were to spend $60 and many hours upgrading the little press, or spend $103 (on sale) for a new press and sell the old one for $40. So in essence the new press cost $3 using man-math. (Don't tell Lemontree I said that. ;) ) Unfortunately, this bigger 10" drill (which is way bigger than the mere 2" size difference would suggest, and something that came as a bit of a surprise when I opened the box) wouldn't even come close to fitting on my shallow work bench. So, I lag-bolted a couple of 2x4s to the bench and then bolted the drill press to that. It sticks out, but it's solid -- I can bounce all my weight on it and it doesn't even flex. I enjoy over-engineering things. :)
Oh and while I was playing with drill presses I made a drill organizer, seen behind the drill press. I have several drill sets that came in nice metal and plastic boxes, but over the years I've collected a bunch of odd bits that either didn't fit in the box or the box was lost or destroyed, so drilling a hole with each bit in a scrap of 2x4 solved that.
 The other section of bench is going to be for reloading. I already mounted my press on the far right, though I still need to buy a little stool so I can sit in comfort instead of standing like I used to do in the pre-garage-revamp days.
I think I've going to start referring to the garage as my man-cave (again, Lemontree need not know this). Admittedly, we plan on getting some woodworking stuff that Lemontree will use out in the garage too so maybe I'll have to come up with a different name. Fortress of Awesomeness?
31 May 2011

24 May 2011
Ad-free, free Android apps
When I got my Android smartphone, I was looking forward to all the cool apps I could put on it. Then I discovered the cruel reality that you have to pay for apps (lame) or allow them to show you ads (super lame). At least the ad-laden apps are easy to spot since they all require the "Full internet access" permission, so I can reject them with extreme prejudice before installing them.
Anyway, since I'm cheap, and I hate ads (which is why I use a DVR to skip TV ads, and FireFox to block web ads), I've been forced to dig deep to find decent apps that are both free and ad-free. There aren't many, and most of them are crappy. Nevertheless, here are the hidden gems, the ad-free free Android apps I have on my phone right now.
File Expert (Geek Software Technology)
Really, Android should come with a file manager of some kind. This kind of omission is just silly. File Expert does the job, though the user interface is clunky (copy/pasting and other operations require too many tap-and-holds and too many sub-menus). It also puts itself in your notification bar, which is annoying (I hit Back repeatedly to exit completely and get it out of the bar). For ad-free and free though, I shan't complain.
Nudnik Calendar Notification (Amit Moran)
By default, Android only vibrates once when you have a Calendar reminder come due. Useless. This led to a lot of missed reminders until I installed this app. I have it set up to constantly vibrate, forever, until I acknowledge the reminder. Android should do this out of the box. This ad-free, free version is crippleware (many features locked out), but I don't miss reminders any more so it's 100% functional for me.
Mine Message (Lei YU)
Same as Calendar notifications, Android only vibes once when you get a text message. Again, useless, and the cause of many missed messages. Like Nudnik, I have it set to vibe forever until I read the message.
Moon+ Reader (Moon+)
Android can read text and html files, but using the web browser to do so is a pain (remember, there's no file manager, so you have to type a big long nasty URL to get to every newly added document). The display and search capabilities of the web browser are also limited. The other feature I really, really like on a reader is auto-scroll. That's where the text scrolls slowly by (at a user-adjustable speed) so you don't have to hit any buttons or swipe the screen to "turn" pages. Turning pages is so 19th century. Moon+ addresses all 3 needs with no ads and at no cost. The main menu is kind of clunky (a few extra taps that are really not needed to get to my docs) but on the whole it's a darn good app.
Replica Island (Team Replica)
Fun little game. Very difficult to play with the touch screen, fortunately I have a slide-out keyboard that works quite well for control.
Netflix (Netflix)
Just found this one today. Shame I'm too cheap for a data plan, so I can only watch when I have WiFi access.
Brightness Widget (Sisedi media)
Color smartphone screens are difficult to see in daylight yet are so bright they hurt my eyes at night. To adjust brightness takes a tap, a scroll, and another 4 (yes, FOUR) taps with stock Android. Ridiculous. Try doing all that in sunlight when you can't see the screen, or at 3AM when the screen is blasting your dark-adapted eyes with the visual equivalent of a theater spotlight in your face. This app (or rather, widget), lets you define three brightness presets -- night, indoor, and outdoor. Then you put it on your home screen and tap it to cycle through the 3 settings. Since you know right were the icon is, you can tap it "blind" in sunlight until you can see the screen.
MotoTorch LED (Ryan Alford)
This is neat. The built-in camera has a "flash", which is just a high-brightness LED. This app (with Widget mode) simply turns it on solid so you can use it as a flashlight. It's surprisingly effective, probably a good 10-20 lumens which is more than enough to navigate indoors or in the woods (maybe not so great with city light pollution). As a widget, it's easy to get to by just tapping the icon on your home screen, no sub-menus and junk to fiddle with.
ColorNote Notepad (Notes)
When I first got my smartphone, I found myself composing a lot of emails to myself so I could jot down notes. This takes care of that ugly kludge by allowing fewer taps to enter a note and easy retrieval of notes all in once place instead of scattered in my Inbox.
WiFi Buddy BETA (Andre Rabold)
There are a ton of WiFi apps out there, this one probably isn't the best but it works well enough that I can't be bothered to look for another. Shows a list of available access points and lets you tap on one to connect. Simple and effective, though a little buggy.
Ad-free free Speedometer
Yes, that's the name. I am so obsessed with ad-free, free Android apps that when I wrote one myself, I named it as such. Yes, I wrote an Android app. :) Stock Android will tell you your speed via GPS, but it's a torturous path to open My Tracks, start recording a track, and switch to the details screen to see the speed in little tiny numbers. Not that you should be operating a phone at all while driving, but this is particularly dangerous. Also, I don't like the privacy concerns of software recording my whereabouts. My app just shows the speed in great big numbers as soon as you tap it's icon, and that's it. That's pretty much all it does. Oh, eventually I will upgrade it to read in MPH, km/h, and knots, save your top speed, display your compass heading (N, NE, E, etc), and allow different display color schemes, but for now it's just a simple free speedo with no ads. It's not in the Android Marketplace, because it would cost me like $30 to publish it there (remember I'm cheap, and I won't be making any money from an ad-free free app). So if you want to use it you'll have to tell your phone it's OK to install apps from "untrusted sources" and download it from here.
23 March 2011
State Fair
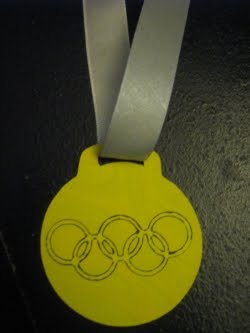
Each child in Tiffany's fifth grade class-- in fact all the fifth graders in her school were assigned a state to study and report on. After this nearly one month project, they held a "State Fair" where each child acted as a tour guide of their state. They dressed as a famous person from the state and even handed out samples of local cuisine. Tiffany chose to study Illinois-- as that is where her dad served a church mission. It was difficult for her to decide between dressing as Abraham Lincoln or Jackie Joyner-Kersee, an Olympic athlete. As you can probably guess from the picture, she decided on the athlete. I made her two gold medals to wear, and cut the letters USA to tape to her jacket. Her food sample was even harder to choose. We considered and threw out the idea of getting a Chicago Deep Dish Pizza. She finally decided to give out Oreo cookies, as Illinois has the largest cookie factory in the world-- Nabisco.
Fire Lite CC LLC
That's the name of my new business! I just set it all up today. I made up a website, too. Come check it out at www.firelite.cc. That's where I'll sell my svg files, cards (plus a card mailing service!), and whatever else I come up with. Eventually, Corwin will include flashlights and other trinkets he will make on his lathe... once the Jetta is done.
07 March 2011
Me and my Cricut
Last fall I visited my cousin, and she showed me all the cool things she makes with her Cricut machine. Now, I'm not one to spend all my time decorating or scrapbooking. Still I was intrigued. I mean, how cool is it that you can make paper dolls, cards, scrapbook pages, decorate walls, make glass etching templates, etc, etc all with one little machine? So, yah, I was impressed. Machines were on sale for black Friday, and I decided to buy one. Now, there was a drawback that I could see, and it was buying cartridges. All the cool little design elements have to be bought separately via cartridges. Corwin encouraged me to search the internet for alternatives. This I did, and happily came upon a design studio for the Cricut called Sure Cuts A Lot. (Cricut also has its own design studio for purchase, but it is not compatible with making your own designs, and you still have to buy their cartridges). So for the price of a cartridge or two, I can make and cut practically whatever I want!
There's so much I've done with the Cricut already! The kids made simple valentines that were personal and unique for each of their classmates. I cut the words out to decorate our Primary bulletin board at church. We've made many cards besides.
I made our Christmas cards last year. I started out by designing a snowman family. It was quite fun. I paper pieced a few together. There were so many little pieces! It literally took me an hour to glue all the pieces on one card! After a few of them, I got smarter and decided to simplify my cards, so the rest were simply wreaths. :) I thought they were cute, and oh! so much less time consuming.
Lastly, I'm going to start offering my designs and cards, etc. for sale. I've just made a new blog site for this purpose. If you would like to follow it, it is located at http://firelite.cc.
Subscribe to:
Posts (Atom)